xzyl的博客

沉淀,分享

0%

走近SSH

历史

今天我们聊的不是”古老”的 JAVA SSH,而是诞生至今已20多年的网络安全协议-SSH。SSH 是 Secure Shell 的简称,是一种使得数据在网络中安全传输的协议。在信息爆炸,信息安全愈发重要的今天,SSH 已无处不在,应用十分广泛,正如其官网描述的:

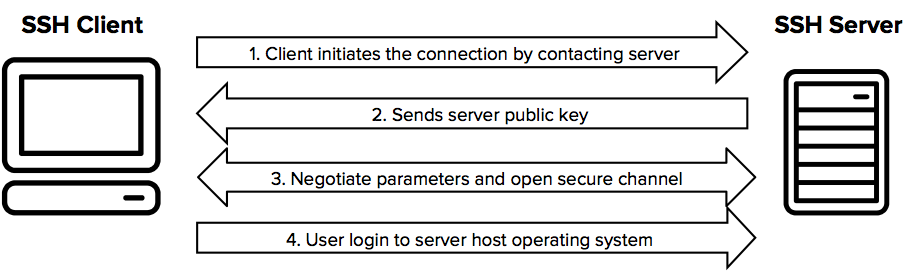
The SSH (Secure Shell) protocol is used for remote logins, file transfers, and automated systems management. It is used to manage the Internet infrastructure, cloud infrastructure, enterprise IT infrastructure, and remote servers in data centers.

是的,其也在云基础设施广泛使用,SSH 早已成一个标准,各个类 Unix 或 Linux 都原生支持,SSH 运维或者如今的 DevOPS 对于其再熟悉不过了。

加密

​ SSH 作为一个安全协议,SSH 起初只是为了使得即使在不安全的网络环境下也能保障数据传输的安全。安全来自于 SSH 使用的各种加密算法,如:aes, rsa, dsa, ecdsa 等,其中的 rsa 使用就相当广泛。当然这里需要强调的是,SSH 中是使用对称加密来加密进行通信的,非对称加密只是用在认证用户身份

实践道原理

​ SSH只是一个协议,所以有各种各样的实现,有商业的,也有开源的。开源中以 OpenSSH 最为出名,也是最广泛使用的开源实现。 Xshell,PuTTY 等软件都集成或者实现了 SSH 协议。SSH 的实现使用 CS (Client-Server) 模式,所以 SSH 有客户端和服务端,下面是它们的交互过程:

  1. 客户端与服务端建立连接

  2. 客户端发送公钥到服务端

  3. 服务端验证并建立安全通道

  4. 客户端登录到服务端

SSH 最常用的就是免密登陆,我们就以免密登陆的实际操作来说明 SSH 的原理。

下面我会演示一个实际登录远程服务器的例子来说明 SSH 的工作过程。

SSH server:172.22.8.204

user: test

会话加密协商(Session Encryption Negotiation

使用test账号登录到服务器:

1
2
3
4
➜  ~ ssh test@172.22.8.204
The authenticity of host '172.22.8.204 (172.22.8.204)' can't be established.
RSA key fingerprint is SHA256:vyZw9CtMUy3l6RWyXDgINZZvbjJxF177s0oMKYcUUqs.
Are you sure you want to continue connecting (yes/no/[fingerprint])?

出现了让选择项,这个选择项应该很多人都见到过。使用-v选项查看详情:

1
2
3
4
5
6
7
8
9
10
11
12
13
14
15
16
17
18
19
20
21
22
23
24
25
26
➜  ~ ssh -v test@172.22.8.204
OpenSSH_8.2p1 Ubuntu-4ubuntu0.1, OpenSSL 1.1.1f 31 Mar 2020
debug1: Reading configuration data /etc/ssh/ssh_config
debug1: /etc/ssh/ssh_config line 19: include /etc/ssh/ssh_config.d/*.conf matched no files
debug1: /etc/ssh/ssh_config line 21: Applying options for *
debug1: Connecting to 172.22.8.204 [172.22.8.204] port 22.
debug1: Connection established.
debug1: identity file /root/.ssh/id_rsa type -1
debug1: identity file /root/.ssh/id_rsa-cert type -1
...
...
debug1: Local version string SSH-2.0-OpenSSH_8.2p1 Ubuntu-4ubuntu0.1
debug1: Remote protocol version 2.0, remote software version OpenSSH_8.2p1 Ubuntu-4
debug1: match: OpenSSH_8.2p1 Ubuntu-4 pat OpenSSH* compat 0x04000000
debug1: Authenticating to 172.22.8.204:22 as 'test'
debug1: SSH2_MSG_KEXINIT sent
debug1: SSH2_MSG_KEXINIT received
debug1: kex: algorithm: curve25519-sha256
debug1: kex: host key algorithm: rsa-sha2-512
debug1: kex: server->client cipher: chacha20-poly1305@openssh.com MAC: <implicit> compression: none
debug1: kex: client->server cipher: chacha20-poly1305@openssh.com MAC: <implicit> compression: none
debug1: expecting SSH2_MSG_KEX_ECDH_REPLY
debug1: Server host key: ssh-rsa SHA256:vyZw9CtMUy3l6RWyXDgINZZvbjJxF177s0oMKYcUUqs
The authenticity of host '172.22.8.204 (172.22.8.204)' can't be established.
RSA key fingerprint is SHA256:vyZw9CtMUy3l6RWyXDgINZZvbjJxF177s0oMKYcUUqs.
Are you sure you want to continue connecting (yes/no/[fingerprint])?

我们可以看到:

Server host key: ssh-rsa SHA256:vyZw9CtMUy3l6RWyXDgINZZvbjJxF177s0oMKYcUUqs

该散列值和下面的一致:

RSA key fingerprint is SHA256:vyZw9CtMUy3l6RWyXDgINZZvbjJxF177s0oMKYcUUqs

我们此时可以在服务端运行debug模式,查看日志:

1
2
3
4
5
6
7
8
9
10
11
debug1: audit_event: unhandled event 12
➜ ~ sudo /usr/sbin/sshd -d
debug1: sshd version OpenSSH_8.2, OpenSSL 1.1.1f 31 Mar 2020
debug1: private host key #0: ssh-rsa SHA256:vyZw9CtMUy3l6RWyXDgINZZvbjJxF177s0oMKYcUUqs
debug1: Unable to load host key: /etc/ssh/ssh_host_ecdsa_key
debug1: Unable to load host key: /etc/ssh/ssh_host_ed25519_key
debug1: rexec_argv[0]='/usr/sbin/sshd'
debug1: rexec_argv[1]='-d'
debug1: Set /proc/self/oom_score_adj from 0 to -1000
debug1: Bind to port 22 on 0.0.0.0.
Server listening on 0.0.0.0 port 22.

可以看到:

private host key #0: ssh-rsa SHA256:vyZw9CtMUy3l6RWyXDgINZZvbjJxF177s0oMKYcUUqs

可以看到三者都是一致的。

host key

这里引出一个概念:host key

host key 是为了客户端验证服务器的身份真实性,使用非对称加密算法。私钥存在服务端,正如上面在客户端日志中看到的:

Server host key: ssh-rsa SHA256:vyZw9CtMUy3l6RWyXDgINZZvbjJxF177s0oMKYcUUqs

公钥由服务端发送给客户端。公钥是由给定的私钥得到的,私钥文件名如下:

1
2
3
4
# /etc/ssh/sshd_config 配置文件
#HostKey /etc/ssh/ssh_host_rsa_key
#HostKey /etc/ssh/ssh_host_ecdsa_key
#HostKey /etc/ssh/ssh_host_ed25519_key

sshd 在启动时会依次寻找这些设置的文件,在删掉这些文件后:

1
2
3
4
5
6
7
➜  ~ sudo /usr/sbin/sshd -d
[sudo] password for xzy:
debug1: sshd version OpenSSH_8.2, OpenSSL 1.1.1f 31 Mar 2020
debug1: Unable to load host key: /etc/ssh/ssh_host_rsa_key
debug1: Unable to load host key: /etc/ssh/ssh_host_ecdsa_key
debug1: Unable to load host key: /etc/ssh/ssh_host_ed25519_key
sshd: no hostkeys available -- exiting.

可以看到日志正如上面描述的,找不到 host key 文件,无法启动。遇到该问题,使用 ssh-keygen 生成一个密钥文件到指定位置就可以解决,文件名需要与配置中的一致。

由于默认存在 ssh_host_rsa_key 文件,所以使用了 ssh_host_rsa_key 中的私钥来生成公钥。

不过上面三者都提到的数据并不是公钥,而是公钥对应的指纹哈希(fingerprint_hash),直接在服务器上运行如下命令可以看到由私钥生成的指纹哈希:

1
2
3
4
5
➜  ~ sudo ssh-keygen -l -f /etc/ssh/ssh_host_rsa_key
3072 SHA256:vyZw9CtMUy3l6RWyXDgINZZvbjJxF177s0oMKYcUUqs root@qyq (RSA)
# 服务端的公钥
➜ xuzha sudo ssh-keygen -y -f /etc/ssh/ssh_host_rsa_key
ssh-rsa AAAAB3NzaC1yc2EAAAADAQABAAABgQDGr00hIjIBa37HagDxipqaSvevuyAt4niRUvYqoV8ecfaQG/SXytsGiwOPNn3zeKGc66JhJGOMBC8SW4Ph9ok8pmurDd2noQse3V5Sbxqs5F+4TLpSnz6aOkwHmpb0qCKqf6VmNK8MIiuCcY6H9V7DNLS4old4DDhDrf2NcSt/6nj9uGdpfeVcQD717VGC+ZrrQM4rBQica+maPr8174vGYuXVB1oIorjSzsHoFp9WWYqzKSODZj1Ur71vkaR/cSCaUIRP3UycO8n3Xynd3zAiCcRfMBnqLSr0t8PdWN+MOFRgRHVZzjUvVG4CP9o2Uih30gvtj8f15DyKDTJKsmsMVtRR1y4ZAUM+UQyjAcUmLC+GgnvGNu0d2sUwW9Nges8d8I4y+Toyai+ABXqEs0skJvjEIY6Ciuc57BTHun1348lGn6Zcxjay/FJRtwpYt5x1xrAAKY+XN5kZUjCZZxh6/En3MKckKG9BUXeXA2reF0T4UX8YMTa7lQGqY6g3gu8= root@qaq

这里存在一个问题:我们无法确认上面得到的指纹哈希是否真的是来自服务端,有可能在中间被人修改的,是的,这就是中间人攻击。为了确认来自于服务端,需要用额外的方式向服务端确认指纹哈希的真实性。当然使用 CA 也是常用的解决方法。

known hosts

接着上面客户端登录,直接按回车键:

1
2
3
4
5
6
7
8
9
10
11
12
13
14
15
16
17
18
19
RSA key fingerprint is SHA256:vyZw9CtMUy3l6RWyXDgINZZvbjJxF177s0oMKYcUUqs.
Are you sure you want to continue connecting (yes/no/[fingerprint])? yes
Warning: Permanently added '172.22.8.204' (RSA) to the list of known hosts.
debug1: rekey out after 134217728 blocks
debug1: SSH2_MSG_NEWKEYS sent
debug1: expecting SSH2_MSG_NEWKEYS
debug1: SSH2_MSG_NEWKEYS received
debug1: rekey in after 134217728 blocks
debug1: Will attempt key: /root/.ssh/id_rsa
...
debug1: SSH2_MSG_EXT_INFO received
debug1: kex_input_ext_info: server-sig-algs=<ssh-ed25519,sk-ssh-ed25519@openssh.com,ssh-rsa,rsa-sha2-256,rsa-sha2-512,ssh-dss,ecdsa-sha2-nistp256,ecdsa-sha2-nistp384,ecdsa-sha2-nistp521,sk-ecdsa-sha2-nistp256@openssh.com>
debug1: SSH2_MSG_SERVICE_ACCEPT received
debug1: Authentications that can continue: publickey
debug1: Next authentication method: publickey
debug1: Trying private key: /root/.ssh/id_rsa
...
debug1: No more authentication methods to try.
test@172.22.8.204: Permission denied (publickey).

我们可以看到:

Permanently added ‘172.22.8.204’ (RSA) to the list of known hosts.

这里需要解释另外一个概念:known hosts

known hosts 是一个记录了上诉操作相关的远程服务器 host key 的公钥信息的文件。当公钥信息与来自服务器的公钥信息一致时,就证明了服务器的真实性。

当我们再次执行登录操作:

1
2
3
4
5
6
7
8
9
10
11
12
13
14
15
16
17
➜  / ssh -v test@172.22.8.204
...
...
debug1: Server host key: ssh-rsa SHA256:vyZw9CtMUy3l6RWyXDgINZZvbjJxF177s0oMKYcUUqs
debug1: Host '172.22.8.204' is known and matches the RSA host key.
debug1: Found key in /root/.ssh/known_hosts:2
debug1: rekey out after 134217728 blocks
debug1: SSH2_MSG_NEWKEYS sent
debug1: expecting SSH2_MSG_NEWKEYS
debug1: SSH2_MSG_NEWKEYS received
debug1: rekey in after 134217728 blocks
debug1: Will attempt key: /root/.ssh/id_rsa
...
...
debug1: Trying private key: /root/.ssh/id_rsa
...
test@172.22.8.204: Permission denied (publickey).

可以看到多了下面两行信息:

1
2
debug1: Host '172.22.8.204' is known and matches the RSA host key.
debug1: Found key in /root/.ssh/known_hosts:2

但目前为止其实我们已经完成了 SSH 工作流的第一步:会话加密协商,这也是在加密一节中提到的:SSH 是用对称加密加密连接的实现原理。

1
2
debug1: Local version string SSH-2.0-OpenSSH_8.2p1 Ubuntu-4ubuntu0.1
debug1: Remote protocol version 2.0, remote software version OpenSSH_8.2p1 Ubuntu-4

这一部分描述了双方支持的 SSH 协议版本,并最终匹配出了合适的版本:

1
debug1: match: OpenSSH_8.2p1 Ubuntu-4 pat OpenSSH* compat 0x04000000

协商过程其实是对会话加密使用的密钥生成的过程:

1
2
3
4
5
6
7
debug1: SSH2_MSG_KEXINIT sent
debug1: SSH2_MSG_KEXINIT received
debug1: kex: algorithm: curve25519-sha256
debug1: kex: host key algorithm: rsa-sha2-512
debug1: kex: server->client cipher: chacha20-poly1305@openssh.com MAC: <implicit> compression: none
debug1: kex: client->server cipher: chacha20-poly1305@openssh.com MAC: <implicit> compression: none
debug1: expecting SSH2_MSG_KEX_ECDH_REPLY

这部分描述了对称密钥生成的一些信息,生成的密钥不会在双方传递,而是依靠各自已有的信息计算出来的,这依赖于 Diffie-Hellman 算法:

  1. Both parties agree on a large prime number, which will serve as a seed value.
  2. Both parties agree on an encryption generator (typically AES), which will be used to manipulate the values in a predefined way.
  3. Independently, each party comes up with another prime number which is kept secret from the other party. This number is used as the private key for this interaction (different than the private SSH key used for authentication).
  4. The generated private key, the encryption generator, and the shared prime number are used to generate a public key that is derived from the private key, but which can be shared with the other party.
  5. Both participants then exchange their generated public keys.
  6. The receiving entity uses their own private key, the other party’s public key, and the original shared prime number to compute a shared secret key. Although this is independently computed by each party, using opposite private and public keys, it will result in the same shared secret key.
  7. The shared secret is then used to encrypt all communication that follows.

感兴趣的同学可以到参考的页面中了解更多信息。

当然这样也还是存在风险的可能,为了进一步降低风险,SS2 中还会有 rekey 机制,过一定时间就重新生成上诉的会话密钥:

debug1: rekey out after 134217728 blocks
debug1: SSH2_MSG_NEWKEYS sent
debug1: expecting SSH2_MSG_NEWKEYS
debug1: SSH2_MSG_NEWKEYS received
debug1: rekey in after 134217728 blocks

到此就是会话加密协商的部分。

验证用户信息

在上面的日志中同时我们还看到:

1
2
3
debug1: Trying private key: /root/.ssh/id_rsa
...
test@172.22.8.204: Permission denied (publickey).

/root/.ssh/id_rsa 是我们定义在配置文件(/etc/ssh/ssh_config)中的项:

1
IdentityFile ~/.ssh/id_rsa

当我们访问服务端时,如果没有指定密钥文件,则会使用上面配置文件中设置的文件。

但是现在我们还没有该密钥创建文件(~/.ssh/id_rsa),先创建之:

1
2
3
4
5
6
7
8
9
10
11
12
13
14
15
16
17
18
19
20
21
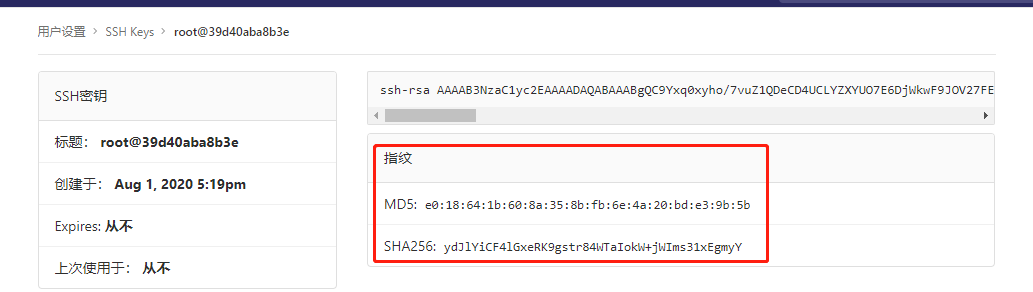
➜  / ssh-keygen
Generating public/private rsa key pair.
Enter file in which to save the key (/root/.ssh/id_rsa):
Enter passphrase (empty for no passphrase):
Enter same passphrase again:
Your identification has been saved in /root/.ssh/id_rsa
Your public key has been saved in /root/.ssh/id_rsa.pub
The key fingerprint is:
SHA256:ydJlYiCF4lGxeRK9gstr84WTaIokW+jWIms31xEgmyY root@39d40aba8b3e
The key's randomart image is:
+---[RSA 3072]----+
| .==o |
| o..*.. |
| . +B o.o o |
| Eo+.o.= = |
| .o. .. S |
| .o. o o |
|o.=.+ o . |
|*O++ + . |
|O+oo+ |
+----[SHA256]-----+

这里有两个需要注意的东西:一个是密钥生成的位置。另一个是密码短语(passphrase)。

第一个我们默认就好,但是需要生成多份密钥给多台服务器使用时,需要给出单独的位置。

第二个密码短语在我们大多数时候都是直接为空,但是有多少人知道这个是来干啥的呢?

A passphrase is similar to a password. However, a password generally refers to something used to authenticate or log into a system. A password generally refers to a secret used to protect an encryption key. Commonly, an actual encryption key is derived from the passphrase and used to encrypt the protected resource.

密码短语是用来保护密钥的,防止密钥文件被破解,最好还是设置密码短语。

我们先查看下公钥的内容,后面会用来跟服务端的公钥进行比较:

1
2
➜  / cat ~/.ssh/id_rsa.pub
ssh-rsa AAAAB3NzaC1yc2EAAAADAQABAAABgQC9Yxq0xyho/7vuZ1QDeCD4UCLYZXYUO7E6DjWkwF9JOV27FEckoFg2WztOFGcH6Flj+vacrHtdRHIE6IpCuOZMQpmSMxW/TI4Wo6/iBUeWPZk9mYzchzfOlIy+Hsk1cDTBVMp8ep3G2dixiyQNNE7uxXaWa8m+DAlEcXFrdVER2iIAEYCNVjUsY/p3zueqVU761nWDnjEYLMoVbJ+BAcR0a30jrT5zduPbYkd44f1BSCZC38gsF6aEJDuy+6xgIWZmuypNBjZynWIupXztt5Qd6ozZJmg0pmmqSfhB9BX5H0CXZdrUO9GGgsmTUt2TeFvqRXjX+LBCWrI8AatpsmFtw0+AcJA8/9cuuCdhHNoZsAZcM/0l3UPuopwcsQqvbcuqKbgK/LodXJmqFyQhHQBX36/wJtyfPOLkwHRRGy2wPZPN2yLR0zliCJ/Xn7Fkx7E4dfunk7p/oFsDT1aWmd16CC8xIE9yRIKvG8k7TQH4yTzkxJxq4zlJrMnelU/w4w0= root@39d40aba8b3e

创建好密钥之后,再次开始登录:

1
2
3
4
5
6
7
8
9
10
11
12
13
14
15
16
17
18
19
20
21
22
23
➜  / ssh -v test@172.22.8.204
...
debug1: expecting SSH2_MSG_KEX_ECDH_REPLY
debug1: Server host key: ssh-rsa SHA256:vyZw9CtMUy3l6RWyXDgINZZvbjJxF177s0oMKYcUUqs
debug1: Host '172.22.8.204' is known and matches the RSA host key.
debug1: Found key in /root/.ssh/known_hosts:2
debug1: rekey out after 134217728 blocks
debug1: SSH2_MSG_NEWKEYS sent
debug1: expecting SSH2_MSG_NEWKEYS
debug1: SSH2_MSG_NEWKEYS received
debug1: rekey in after 134217728 blocks
debug1: Will attempt key: /root/.ssh/id_rsa RSA SHA256:ydJlYiCF4lGxeRK9gstr84WTaIokW+jWIms31xEgmyY
...
debug1: SSH2_MSG_EXT_INFO received
debug1: kex_input_ext_info: server-sig-algs=<ssh-ed25519,sk-ssh-ed25519@openssh.com,ssh-rsa,rsa-sha2-256,rsa-sha2-512,ssh-dss,ecdsa-sha2-nistp256,ecdsa-sha2-nistp384,ecdsa-sha2-nistp521,sk-ecdsa-sha2-nistp256@openssh.com>
debug1: SSH2_MSG_SERVICE_ACCEPT received
debug1: Authentications that can continue: publickey
debug1: Next authentication method: publickey
debug1: Offering public key: /root/.ssh/id_rsa RSA SHA256:ydJlYiCF4lGxeRK9gstr84WTaIokW+jWIms31xEgmyY
debug1: Authentications that can continue: publickey
...
debug1: No more authentication methods to try.
test@172.22.8.204: Permission denied (publickey).

可以看到现在多了公钥的指纹哈希:

1
2
3
debug1: Will attempt key: /root/.ssh/id_rsa RSA SHA256:ydJlYiCF4lGxeRK9gstr84WTaIokW+jWIms31xEgmyY
# 及
debug1: Offering public key: /root/.ssh/id_rsa RSA SHA256:ydJlYiCF4lGxeRK9gstr84WTaIokW+jWIms31xEgmyY

由于现在在服务器上还没有存放客户端的公钥,所以被禁止登录。我们可以使用 ssh-copy-id 进行公钥上传:

1
2
3
4
5
➜  / ssh-copy-id test@172.22.8.204
/usr/bin/ssh-copy-id: INFO: Source of key(s) to be installed: "/root/.ssh/id_rsa.pub"
/usr/bin/ssh-copy-id: INFO: attempting to log in with the new key(s), to filter out any that are already installed
/usr/bin/ssh-copy-id: INFO: 1 key(s) remain to be installed -- if you are prompted now it is to install the new keys
test@172.22.8.204: Permission denied (publickey).

无法上传,这时需要修改服务端上配置(/etc/ssh/sshd_config):

1
PasswordAuthentication yes # 设为yes

再次执行:

/ ssh-copy-id test@172.21.38.72
1
2
3
4
/usr/bin/ssh-copy-id: INFO: Source of key(s) to be installed: "/root/.ssh/id_rsa.pub"
/usr/bin/ssh-copy-id: INFO: attempting to log in with the new key(s), to filter out any that are already installed
/usr/bin/ssh-copy-id: INFO: 1 key(s) remain to be installed -- if you are prompted now it is to install the new keys
test@172.22.8.204's password:

此时要求输入密码,输入即可:

1
2
3
4
5
6
7
8
9
test@172.22.8.204's password:
Authenticated to 172.22.8.204 ([172.22.8.204]:22).
Transferred: sent 3252, received 2832 bytes, in 0.7 seconds
Bytes per second: sent 4366.1, received 3802.2

Number of key(s) added: 1

Now try logging into the machine, with: "ssh 'test@172.22.8.204'"
and check to make sure that only the key(s) you wanted were added.

此时在服务端如下命令:

1
2
➜  ~ ls /home/test/.ssh
authorized_keys

这里又出现了一个新东西:authorized_keys

authorized_keys

The authorized_keys file in SSH specifies the SSH keys that can be used for logging into the user account for which the file is configured. It is a highly important configuration file, as it configures permanent access using SSH keys and needs proper management.

我们以后能不能登录就看它了。查看该文件内容:

1
2
➜  ~ cat .ssh/authorized_keys
ssh-rsa AAAAB3NzaC1yc2EAAAADAQABAAABgQC9Yxq0xyho/7vuZ1QDeCD4UCLYZXYUO7E6DjWkwF9JOV27FEckoFg2WztOFGcH6Flj+vacrHtdRHIE6IpCuOZMQpmSMxW/TI4Wo6/iBUeWPZk9mYzchzfOlIy+Hsk1cDTBVMp8ep3G2dixiyQNNE7uxXaWa8m+DAlEcXFrdVER2iIAEYCNVjUsY/p3zueqVU761nWDnjEYLMoVbJ+BAcR0a30jrT5zduPbYkd44f1BSCZC38gsF6aEJDuy+6xgIWZmuypNBjZynWIupXztt5Qd6ozZJmg0pmmqSfhB9BX5H0CXZdrUO9GGgsmTUt2TeFvqRXjX+LBCWrI8AatpsmFtw0+AcJA8/9cuuCdhHNoZsAZcM/0l3UPuopwcsQqvbcuqKbgK/LodXJmqFyQhHQBX36/wJtyfPOLkwHRRGy2wPZPN2yLR0zliCJ/Xn7Fkx7E4dfunk7p/oFsDT1aWmd16CC8xIE9yRIKvG8k7TQH4yTzkxJxq4zlJrMnelU/w4w0= root@39d40aba8b3e

跟客户端的公钥一致,其实里面存放的就是客户端的公钥,我们也可以登录服务器手动添加该文件,只是 ssh-copy-id 来得更方便。

在工作中我们使用 Gitlab 托管代码,克隆代码时也需要先做同样的操作,只是操作的地方从乌漆嘛黑的命令行到了光鲜亮丽的 WEB 页面:

上图指纹中MD5可以通过如下命令查看:

1
2
3
➜  / ssssh-keygen -l -Emd5
Enter file in which the key is (/root/.ssh/id_rsa):
3072 MD5:e0:18:64:1b:60:8a:35:8b:fb:6e:4a:20:bd:e3:9b:5b root@39d40aba8b3e (RSA)

在流水线中需要克隆代码时,Jenkins 与 Gitlab间也需要配置密钥信息:

上面简单介绍了两处在工作中用到 SSH 的场景,接着回到我们之前的命令行中。

这下我们就可以在客户端愉快的无密码登录了:

1
2
3
4
5
6
7
➜  / ssh -v test@172.22.8.204
...
debug1: Authentications that can continue: publickey,password
debug1: Next authentication method: publickey
debug1: Offering public key: /root/.ssh/id_rsa RSA SHA256:ydJlYiCF4lGxeRK9gstr84WTaIokW+jWIms31xEgmyY
debug1: Server accepts key: /root/.ssh/id_rsa RSA SHA256:ydJlYiCF4lGxeRK9gstr84WTaIokW+jWIms31xEgmyY
Enter passphrase for key '/root/.ssh/id_rsa':

可以看到:

1
debug1: Authentications that can continue: publickey,password

验证方法多了一个 password ,这其实是上面修改服务端配置的效果:

1
PasswordAuthentication yes

接着回到操作,现在需要我们输入密码短语,在输入后:

1
2
3
4
5
6
7
8
9
10
11
12
13
14
15
16
17
18
19
20
21
22
23
24
25
26
27
28
29
30
31
Enter passphrase for key '/root/.ssh/id_rsa':
debug1: Authentication succeeded (publickey).
Authenticated to 172.22.8.204 ([172.22.8.204]:22).
debug1: channel 0: new [client-session]
debug1: Requesting no-more-sessions@openssh.com
debug1: Entering interactive session.
debug1: pledge: network
debug1: client_input_global_request: rtype hostkeys-00@openssh.com want_reply 0
debug1: Remote: /home/test/.ssh/authorized_keys:1: key options: agent-forwarding port-forwarding pty user-rc x11-forwarding
debug1: Sending environment.
Welcome to Ubuntu 20.04 LTS (GNU/Linux 4.19.104-microsoft-standard x86_64)

* Documentation: https://help.ubuntu.com
* Management: https://landscape.canonical.com
* Support: https://ubuntu.com/advantage

System information as of Thu Jul 30 22:13:45 CST 2020

System load: 0.0 Processes: 28
Usage of /: 4.6% of 250.98GB Users logged in: 0
Memory usage: 8% IPv4 address for eth0: 172.22.8.204
Swap usage: 0%


0 updates can be installed immediately.
0 of these updates are security updates.


Last login: Thu Jul 30 22:13:29 2020 from 172.21.32.1
$

终于成功了!好的就此结束,谢谢大家。
开玩笑,我们继续,登录了不做点什么好像没啥意义。

我下面使用 SSH 做点”有意思”的事情:

让服务器同步Github上的代码!(服务器上已经配置好了克隆需要的信息)

回到客户端:

1
2
3
4
5
6
7
8
9
10
11
12
13
14
15
16
17
18
19
20
21
22
23
24
25
26
27
28
29
➜  / ssssh -v test@172.22.8.204 "ssh-keyscan github.com >> ~/.ssh/known_hosts && git clone git@github.com:xzycn/sample.git"
...
Enter passphrase for key '/root/.ssh/id_rsa':
debug1: Authentication succeeded (publickey).
Authenticated to 172.22.8.204 ([172.22.8.204]:22).
debug1: channel 0: new [client-session]
debug1: Requesting no-more-sessions@openssh.com
debug1: Entering interactive session.
debug1: pledge: network
debug1: client_input_global_request: rtype hostkeys-00@openssh.com want_reply 0
debug1: Remote: /home/test/.ssh/authorized_keys:1: key options: agent-forwarding port-forwarding pty user-rc x11-forwarding
debug1: Sending environment.
debug1: Sending command: ssh-keyscan github.com >> ~/.ssh/known_hosts && git clone git@github.com:xzycn/sample.git
# github.com:22 SSH-2.0-babeld-5a455904
Cloning into 'sample'...
Authenticated to github.com ([140.82.113.3]:22).
Transferred: sent 3464, received 3424 bytes, in 1.9 seconds
Bytes per second: sent 1816.6, received 1795.7
debug1: client_input_channel_req: channel 0 rtype exit-status reply 0
debug1: client_input_channel_req: channel 0 rtype eow@openssh.com reply 0
debug1: channel 0: free: client-session, nchannels 1
Transferred: sent 3284, received 4132 bytes, in 10.1 seconds
Bytes per second: sent 326.6, received 410.9
debug1: Exit status 0

可以看到我们执行的命令:

1
debug1: Sending command: ssh-keyscan github.com >> ~/.ssh/known_hosts && git clone git@github.com:xzycn/sample.git

服务端上 sample 仓库中文件内容:

1
2
➜  ~ cat sample/README.md
# sample

修改Github仓库中README后,让服务端同步修改:

1
2
3
4
5
6
7
8
9
10
11
12
13
14
15
16
17
18
➜  / ssh -v test@172.22.8.204 "cd sample && git pull"
...
debug1: Sending command: cd sample && git pull
Authenticated to github.com ([140.82.113.3]:22).
Transferred: sent 3472, received 4312 bytes, in 2.1 seconds
Bytes per second: sent 1678.5, received 2084.6
From github.com:xzycn/sample
32b8fb6..83f8d36 master -> origin/master
Updating 32b8fb6..83f8d36
Fast-forward
README.md | 4 +++-
1 file changed, 3 insertions(+), 1 deletion(-)
debug1: client_input_channel_req: channel 0 rtype exit-status reply 0
debug1: client_input_channel_req: channel 0 rtype eow@openssh.com reply 0
debug1: channel 0: free: client-session, nchannels 1
Transferred: sent 3220, received 3992 bytes, in 7.4 seconds
Bytes per second: sent 435.0, received 539.2
debug1: Exit status 0

服务端上 sample 仓库中文件内容:

1
2
3
4
➜  ~ cat sample/README.md
# sample

> 演示仓库 # 记于:2020年7月31日23:10:05

这样每次都要输一长串命令,是不是觉得很繁琐?没事儿,我们可以把这一大堆的命令塞进一个文件里:

1
2
3
➜  / cat task.sh
cd sample
git pull

通过将文件内容重定向到 SSH 命令:

1
2
3
4
5
6
7
8
9
10
11
12
13
14
15
16
17
18
19
20
21
22
23
24
25
26
27
28
29
30
31
➜  / ssh -v test@172.22.8.204  < ./task.sh
...
debug1: Sending environment.
Welcome to Ubuntu 20.04 LTS (GNU/Linux 4.19.104-microsoft-standard x86_64)

* Documentation: https://help.ubuntu.com
* Management: https://landscape.canonical.com
* Support: https://ubuntu.com/advantage

System information as of Sat Aug 1 11:11:24 CST 2020

System load: 0.0 Processes: 20
Usage of /: 4.6% of 250.98GB Users logged in: 0
Memory usage: 8% IPv4 address for eth0: 172.22.8.204
Swap usage: 0%


0 updates can be installed immediately.
0 of these updates are security updates.


Authenticated to github.com ([140.82.113.3]:22).
Transferred: sent 3268, received 2712 bytes, in 0.9 seconds
Bytes per second: sent 3810.7, received 3162.4
Already up to date.
debug1: client_input_channel_req: channel 0 rtype exit-status reply 0
debug1: channel 0: free: client-session, nchannels 1
debug1: fd 0 clearing O_NONBLOCK
Transferred: sent 3260, received 4344 bytes, in 3.9 seconds
Bytes per second: sent 835.1, received 1112.8
debug1: Exit status 0

这样虽然好了点,但是在管理几十上百台服务器时还是力不从心。所以我们可以使用一些自动化运维的工具,例如 ansible ,不过这不是本文的内容,有需要的话,我后面可以写写 ansible 的专题文章。

最后通过下图简单描述下整个登录的过程:

补充

  1. 当第一次连接服务器时默认都需要检查其真实性(询问确认指纹哈希的真实性),这会阻碍自动化脚本的执行。此时我们可以添加选项:
1
2
3
-o StrictHostKeyChecking=no
# 或者修改客户端的配置文件
StrictHostKeyChecking=no

需要注意的是,这会直接将服务端公钥写入known_hosts!

除此之外我们还有通过 ssh-keyscan 命令批量获取服务器的公钥:

1
2
3
4
5
6
7
8
# 将服务器地址写入文件
➜ / cat servers
172.22.8.204
172.22.204.5 # 假地址,只为了演示说明

➜ / ssh-keyscan -f servers 2> /dev/null 1>>~/.ssh/known_hosts
➜ / cacat ~/.ssh/known_hosts
172.22.8.204 ssh-rsa AAAAB3NzaC1yc2EAAAADAQABAAABgQDGr00hIjIBa37HagDxipqaSvevuyAt4niRUvYqoV8ecfaQG/SXytsGiwOPNn3zeKGc66JhJGOMBC8SW4Ph9ok8pmurDd2noQse3V5Sbxqs5F+4TLpSnz6aOkwHmpb0qCKqf6VmNK8MIiuCcY6H9V7DNLS4old4DDhDrf2NcSt/6nj9uGdpfeVcQD717VGC+ZrrQM4rBQica+maPr8174vGYuXVB1oIorjSzsHoFp9WWYqzKSODZj1Ur71vkaR/cSCaUIRP3UycO8n3Xynd3zAiCcRfMBnqLSr0t8PdWN+MOFRgRHVZzjUvVG4CP9o2Uih30gvtj8f15DyKDTJKsmsMVtRR1y4ZAUM+UQyjAcUmLC+GgnvGNu0d2sUwW9Nges8d8I4y+Toyai+ABXqEs0skJvjEIY6Ciuc57BTHun1348lGn6Zcxjay/FJRtwpYt5x1xrAAKY+XN5kZUjCZZxh6/En3MKckKG9BUXeXA2reF0T4UX8YMTa7lQGqY6g3gu8=
  1. 在我们给客户端上的私钥加了密码短语(passphrase)后,每次都要输入它:

    1
    Enter passphrase for key '/root/.ssh/id_rsa':

    像极了我们在看影视剧到精彩的时候插播的广告。我们可以使用 ssh-agent 来帮助我们:

ssh-agent is a program to hold private keys used for public key authentication. Through use of environment variables the agent can be located and automatically used for authentication when logging in to other machines using ssh(1).

ssh-agent 使用来帮助我们管理私钥的,有了它,我们后面登录服务器时不需要再输入密码短语了,既方便又没有失去安全性:

1
2
3
4
5
➜  / ssh-agent # 使用 ssh-add 出现 Could not open a connection to your authentication agent 错误时,使用 eval `ssh-agent -s`
Agent pid 801
➜ / ssh-add ~/.ssh/id_rsa
Enter passphrase for /root/.ssh/id_rsa:
Identity added: /root/.ssh/id_rsa (root@39d40aba8b3e)

此时再次登录服务器就不需要再输入密码短语了。

结语

SSH 在现在信息世界中的重要不言而喻,对于其设计思想的理解也使我们在日常开发,系统设计时多了一些思路。对于其的一些使用的掌握更有利于问题的排查和自身工作的提效。总之,SSH 已和我们如影随形,是我们现在 IT 从业人员必备知识。

参考